python按照比例分配数据集:train、test、val
import os
import random

trainval_percent = 0.3  # 可自行进行调节(设置训练和测试的比例是7:3)
train_percent = 1
xmlfilepath = 'Annotations'
txtsavepath = 'ImageSets\Main'
total_xml = os.listdir(xmlfilepath)     # 遍历Annotations文件夹中的文件名

num = len(total_xml)                # 总样本库数目
list = range(num)
tv = int(num * trainval_percent)    # 总数乘以测试和训练的比例
tr = int(tv * train_percent)        # 总数乘以交叉验证的比例
trainval = random.sample(list, tv)  # 从总样本库list中选择tv个随机且独立的元素
train = random.sample(trainval, tr) # 从总样本库list中选择tr个随机且独立的元素

# ftrainval = open('ImageSets/Main/trainval.txt', 'w')
ftest = open('ImageSets/Main/test.txt', 'w')    # 存放测试集文件名的路径
ftrain = open('ImageSets/Main/train.txt', 'w')  # 存放训练集文件名的路径
# fval = open('ImageSets/Main/val.txt', 'w')

for i in list:
    name = total_xml[i][:-4] + '\n'     # 去除文件名中的.xml
    print(i)
    if i in trainval:
        # ftrainval.write(name)
        print('----------',i,name)
        if i in train:
            print('********',i,name)
            ftest.write(name)
        # else:
        # fval.write(name)
    else:
        ftrain.write(name)

# ftrainval.close()
ftrain.close()
# fval.close()
ftest.close()
修改coco128.yaml文件
# COCO 2017 dataset http://cocodataset.org - first 128 training images
# Train command: python train.py --data coco128.yaml
# Default dataset location is next to /yolov5:
#   /parent_folder
#     /coco128
#     /yolov5

# download command/URL (optional)
#download: https://github.com/ultralytics/yolov5/releases/download/v1.0/coco128.zip

# train and val data as 1) directory: path/images/, 2) file: path/images.txt, or 3) list: [path1/images/, path2/images/]
train: D:/Desktop/kdy/car/data/train.txt	# 训练集路径
val: D:/Desktop/kdy/car/data/test.txt		# 测试集路径

# number of classes
nc: 6

names: ['bus','car','microbus','minivan','suv','truck']
修改模型配置文件yolov5s.yaml文件
# parameters
nc: 9 # number of classes   只需要修改这个类别数
depth_multiple: 0.33  # model depth multiple
width_multiple: 0.50  # layer channel multiple

# anchors
anchors:
  - [10,13, 16,30, 33,23]  # P3/8
  - [30,61, 62,45, 59,119]  # P4/16
  - [116,90, 156,198, 373,326]  # P5/32

# YOLOv5 backbone
backbone:
  # [from, number, module, args]
  [[-1, 1, Focus, [64, 3]],  # 0-P1/2
   [-1, 1, Conv, [128, 3, 2]],  # 1-P2/4
   [-1, 3, BottleneckCSP, [128]],
   [-1, 1, Conv, [256, 3, 2]],  # 3-P3/8
   [-1, 9, BottleneckCSP, [256]],
   [-1, 1, Conv, [512, 3, 2]],  # 5-P4/16
   [-1, 9, BottleneckCSP, [512]],
   [-1, 1, Conv, [1024, 3, 2]],  # 7-P5/32
   [-1, 1, SPP, [1024, [5, 9, 13]]],
   [-1, 3, BottleneckCSP, [1024, False]],  # 9
  ]

# YOLOv5 head
head:
  [[-1, 1, Conv, [512, 1, 1]],
   [-1, 1, nn.Upsample, [None, 2, 'nearest']],
   [[-1, 6], 1, Concat, [1]],  # cat backbone P4
   [-1, 3, BottleneckCSP, [512, False]],  # 13

   [-1, 1, Conv, [256, 1, 1]],
   [-1, 1, nn.Upsample, [None, 2, 'nearest']],
   [[-1, 4], 1, Concat, [1]],  # cat backbone P3
   [-1, 3, BottleneckCSP, [256, False]],  # 17

   [-1, 1, Conv, [256, 3, 2]],
   [[-1, 14], 1, Concat, [1]],  # cat head P4
   [-1, 3, BottleneckCSP, [512, False]],  # 20

   [-1, 1, Conv, [512, 3, 2]],
   [[-1, 10], 1, Concat, [1]],  # cat head P5
   [-1, 3, BottleneckCSP, [1024, False]],  # 23

   [[17, 20, 23], 1, Detect, [nc, anchors]],  # Detect(P3, P4, P5)
  ]
训练指令
# --data 训练集的配置文件是 mask_data.yaml,会根据mask_data.yaml去寻找数据集所在位置
# --cfg 会调用一个模型的配置文件,这个文件会告诉它训练一个yolov5s这样一个模型出来
# --weights 所要使用到的预训练的模型,这里表示使用pretrained文件夹下的yolov5s.pt模型
# --epoch 100 在数据集上面训练100轮
# --batch-size 每次喂入模型的数,这里表示每次喂入模型是四个一批
# --device cpu 表示使用CPU训练
python train.py --data mask_data.yaml --cfg mask_yolov5s.yaml --weights pretrained/yolov5s.pt --epoch 100 --batch-size 4 --device cpu

# python train.py --data mask_data.yaml --cfg mask_yolov5l.yaml --weights pretrained/yolov5l.pt --epoch 100 --batch-size 4

# python train.py --data mask_data.yaml --cfg mask_yolov5m.yaml --weights pretrained/yolov5m.pt --epoch 100 --batch-size 4
训练完毕的模型
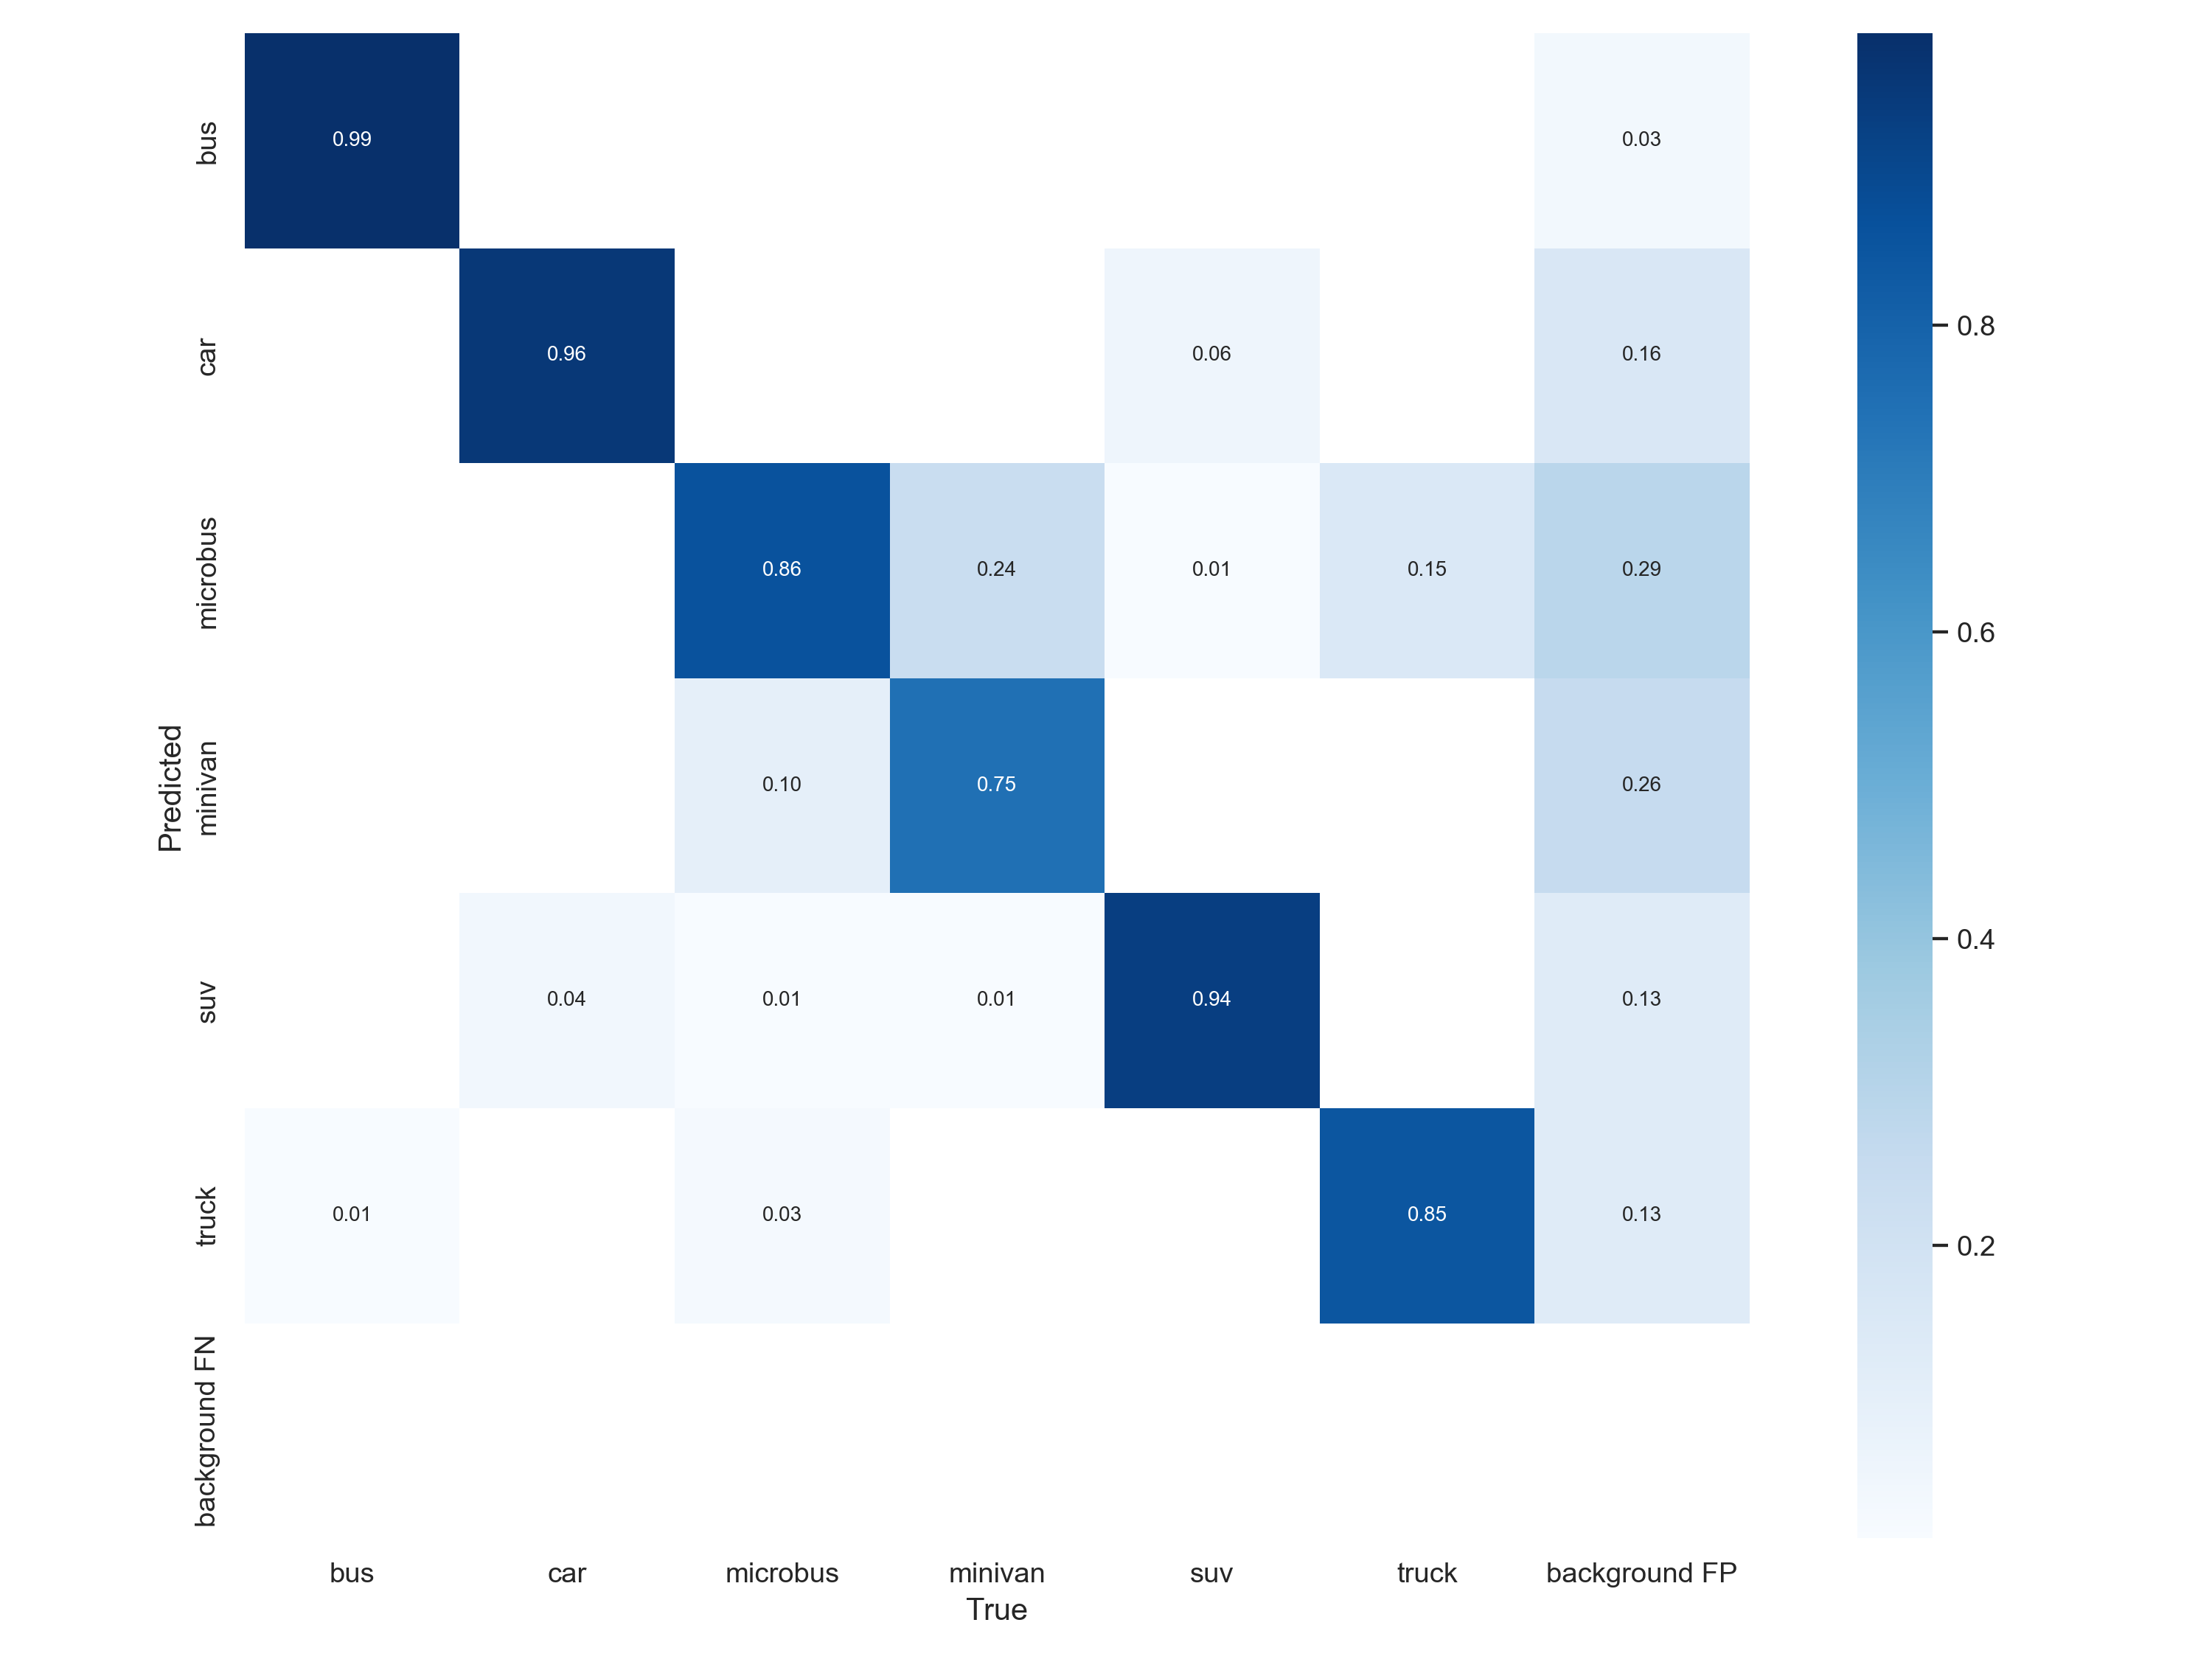
confusion_matrix.png是混淆矩阵,可以看出每个类别的识别准确度
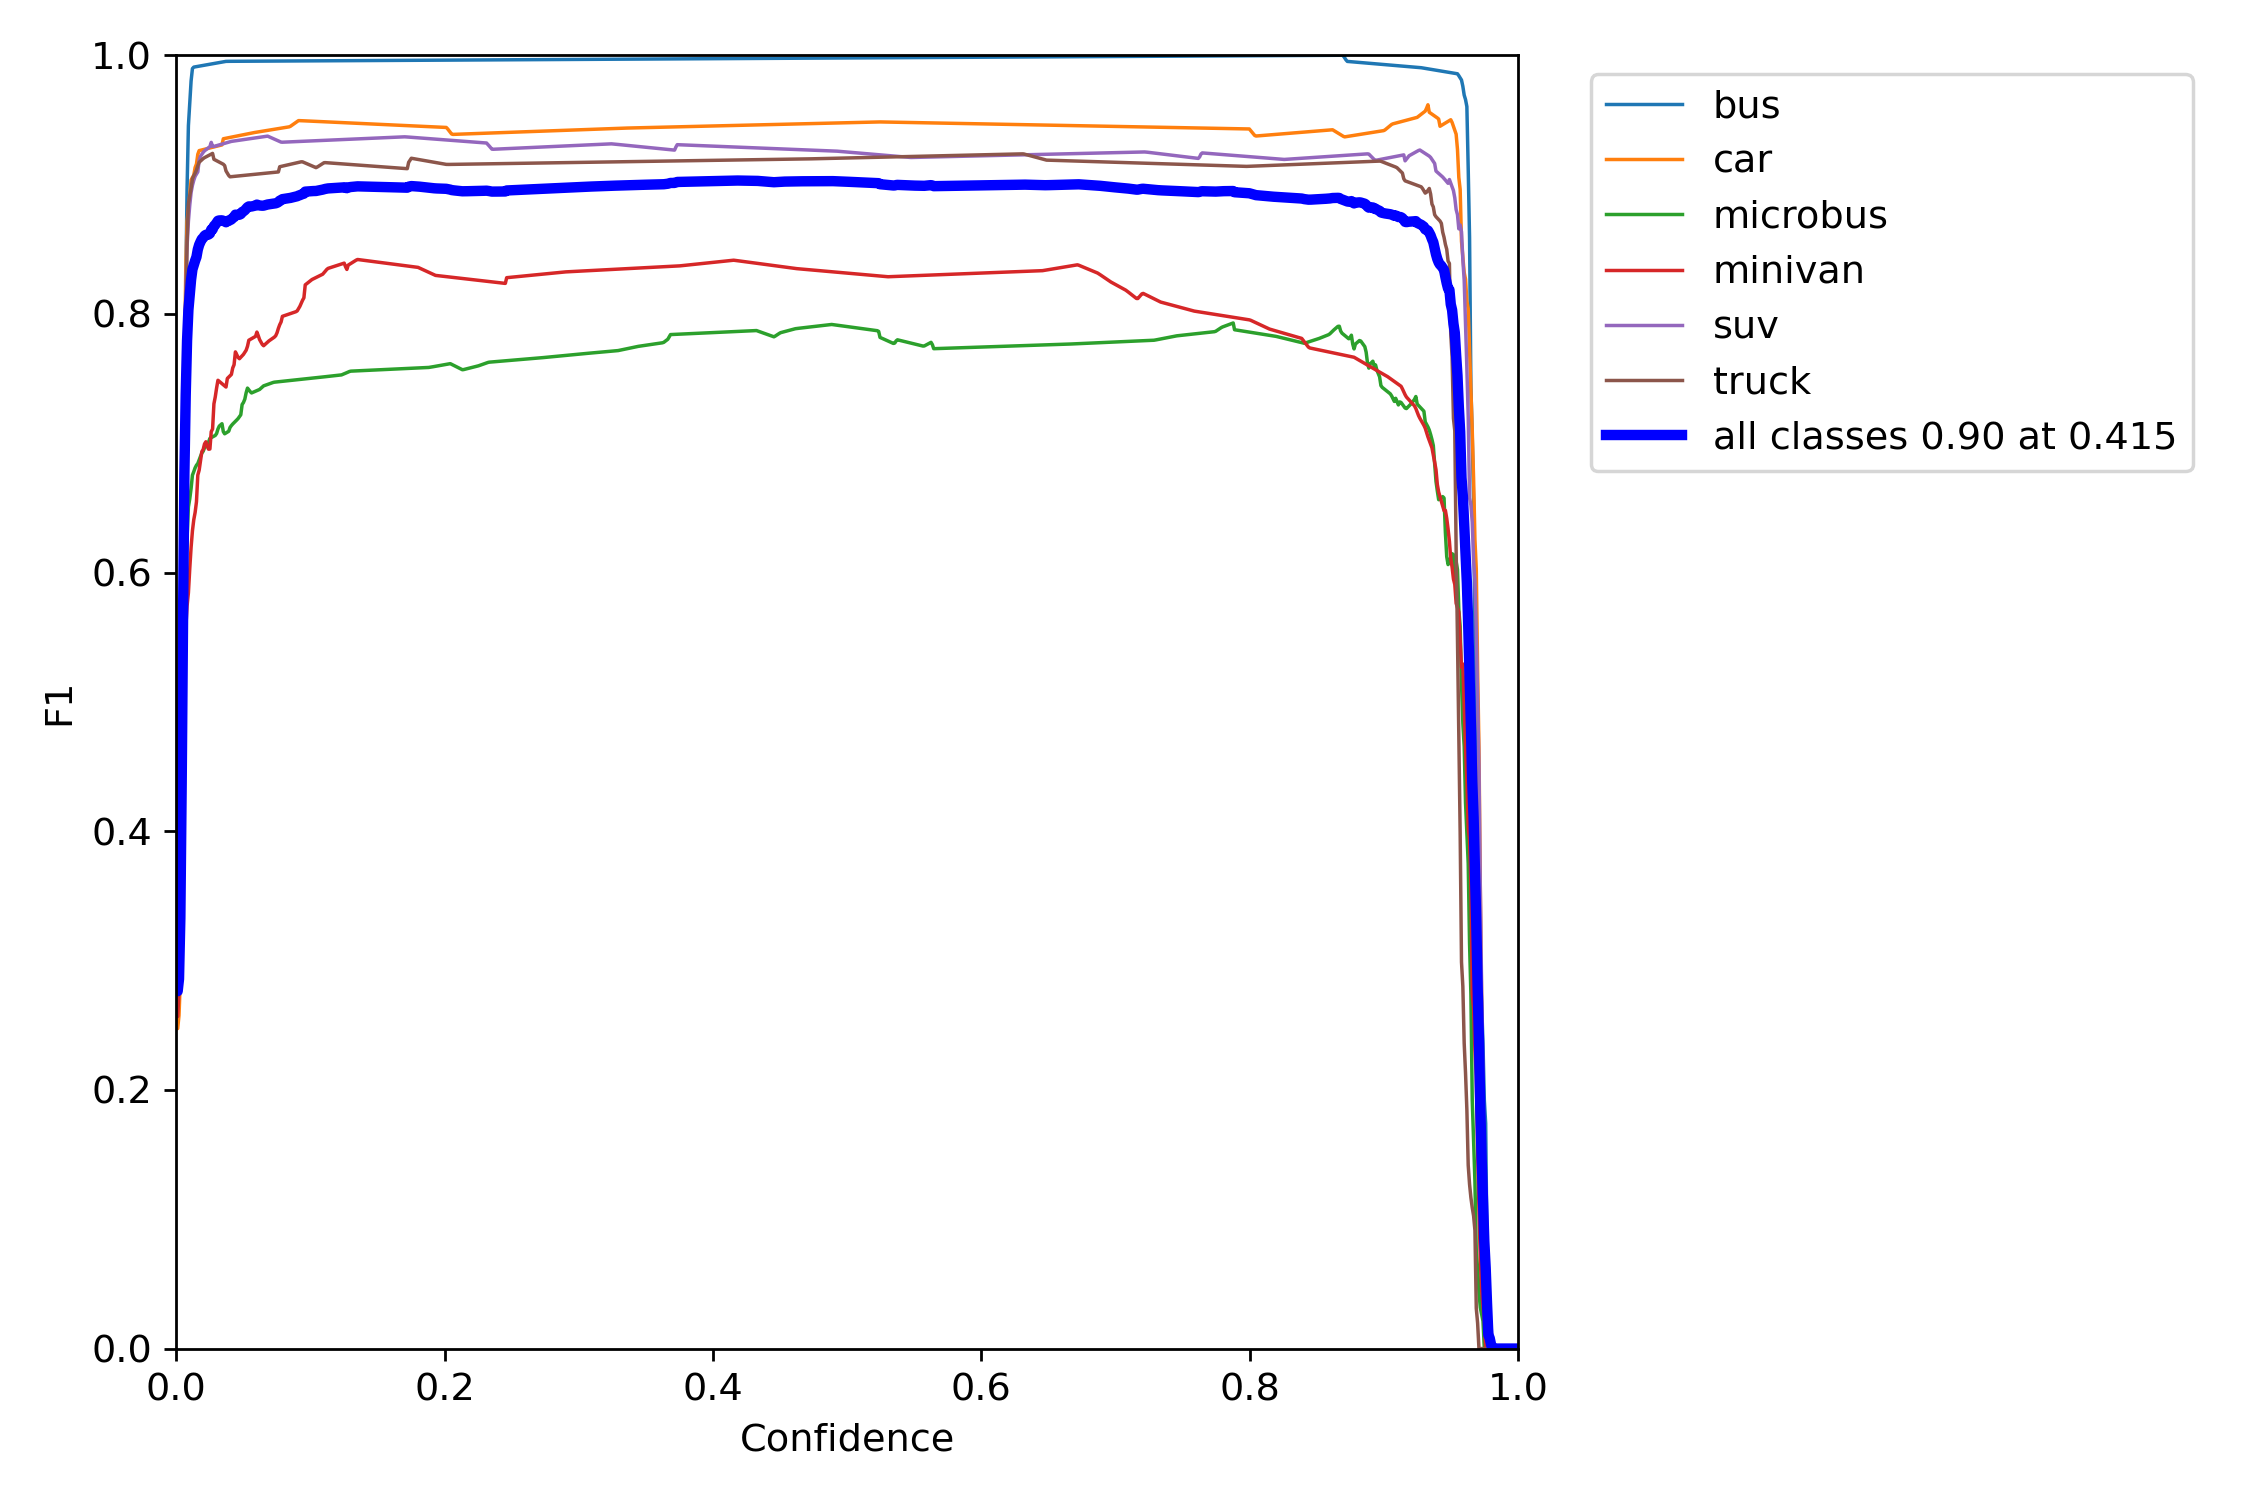
F1是衡量精度的一个指标
P是精度的曲线

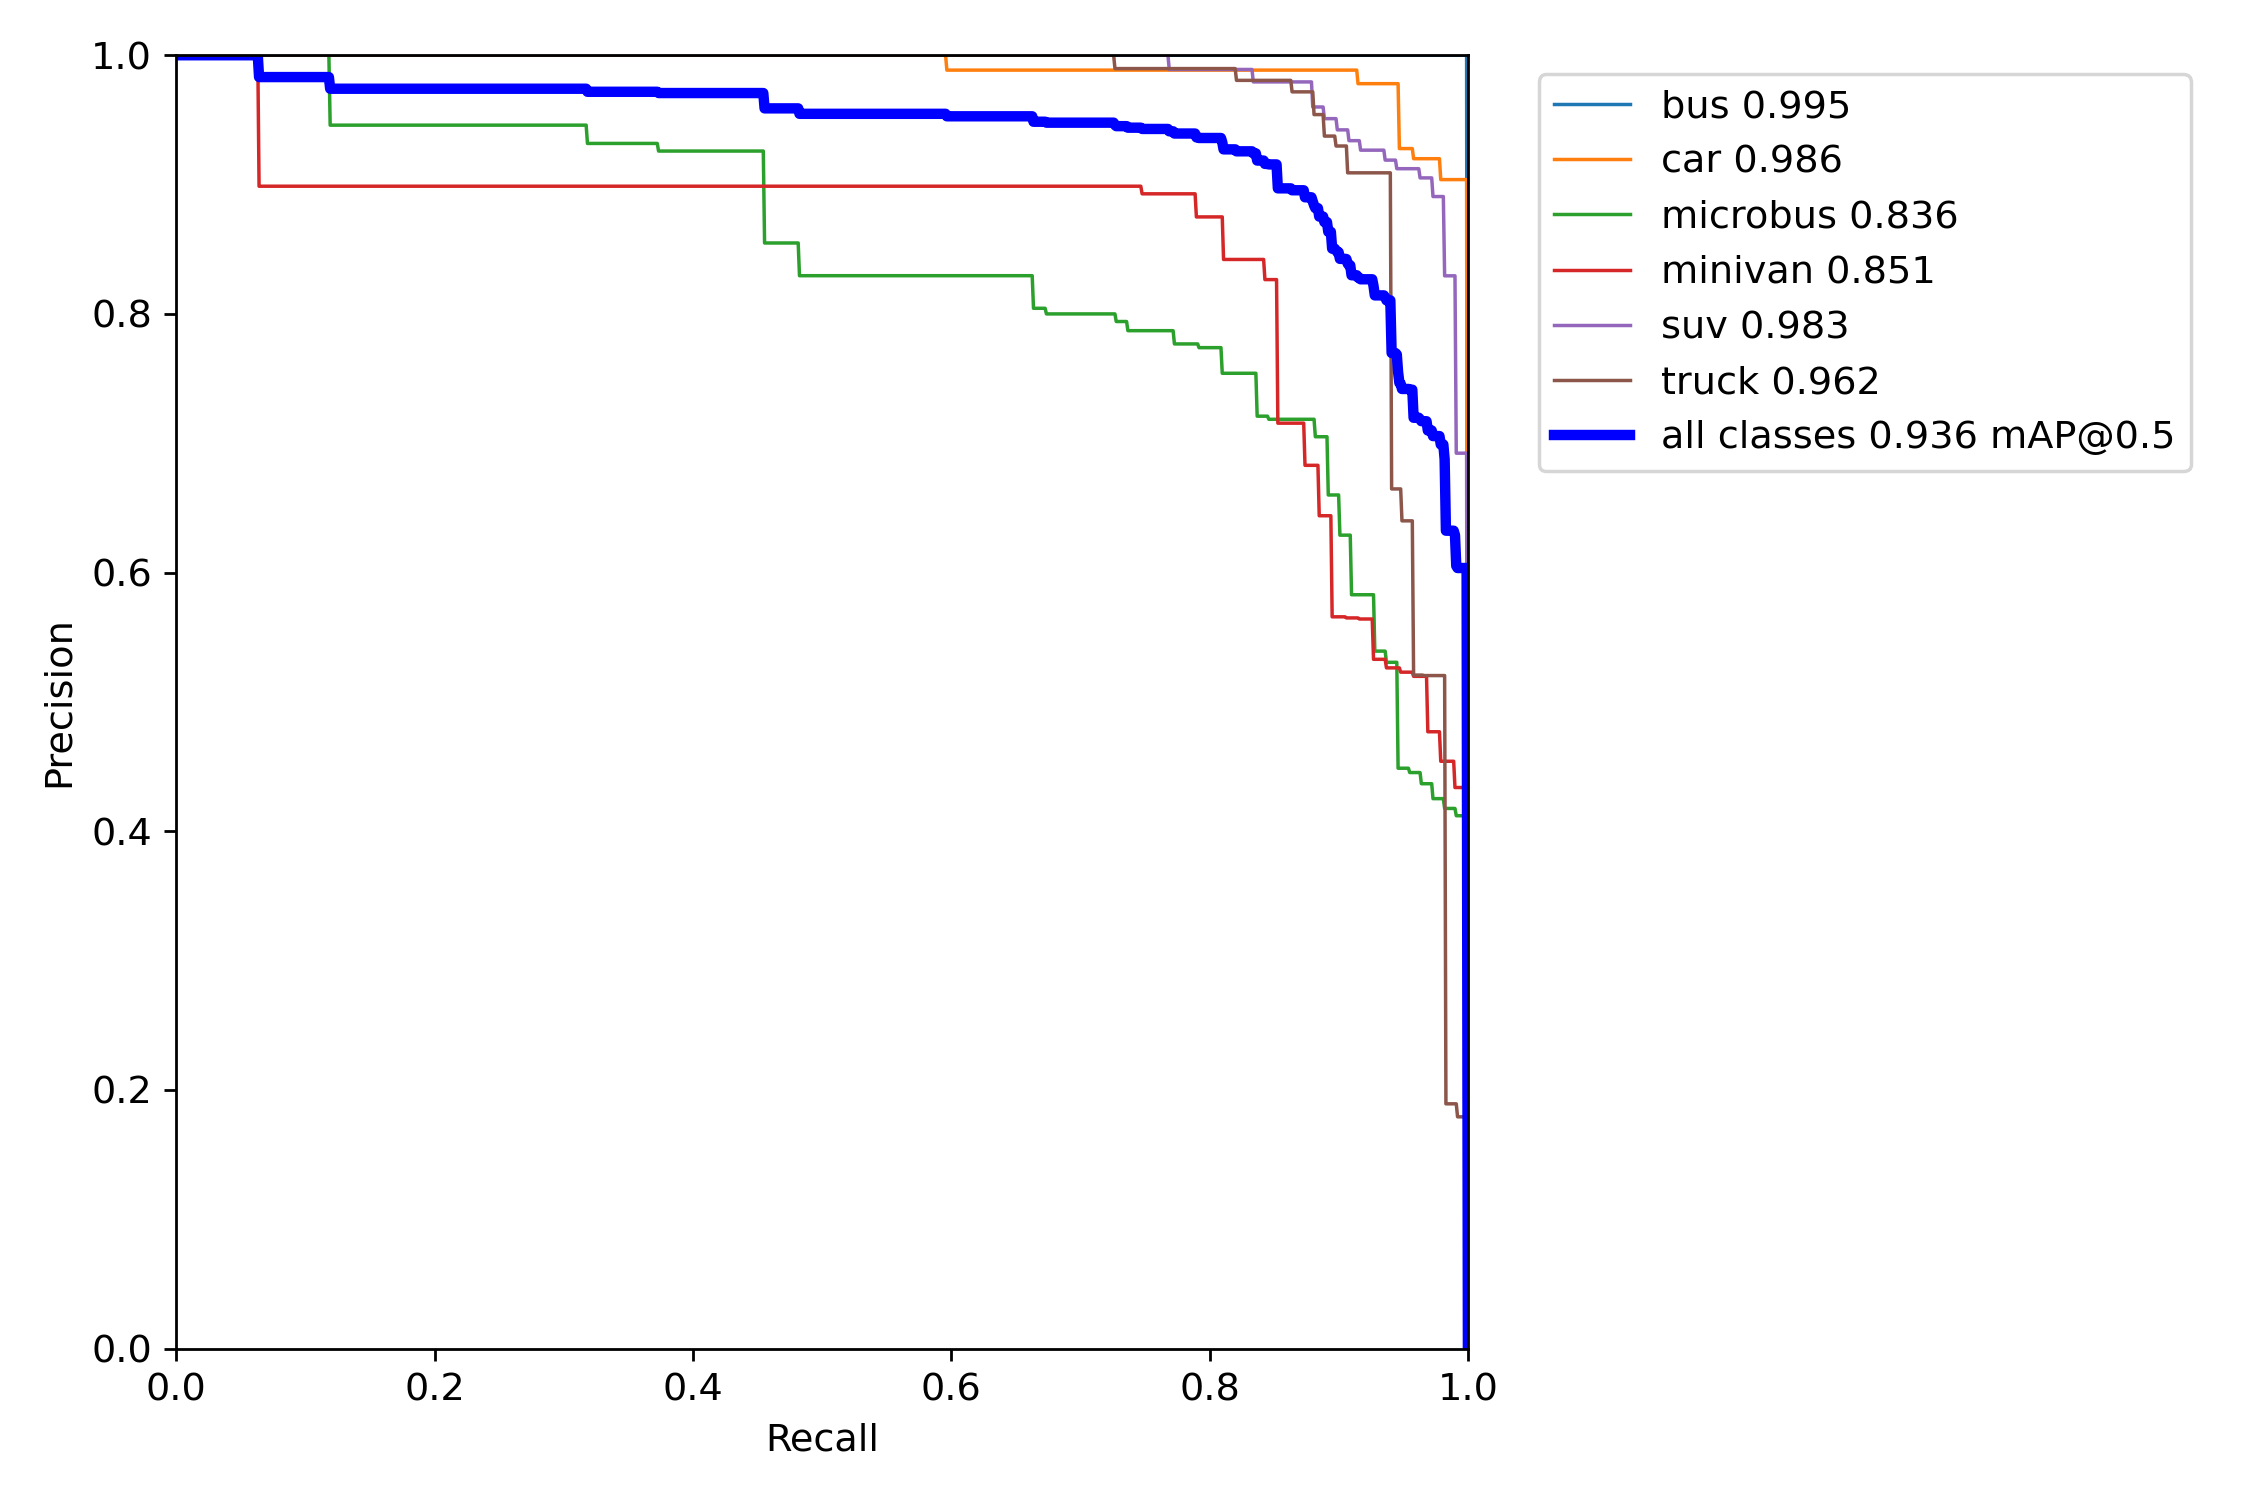
PR是map综合指标的曲线
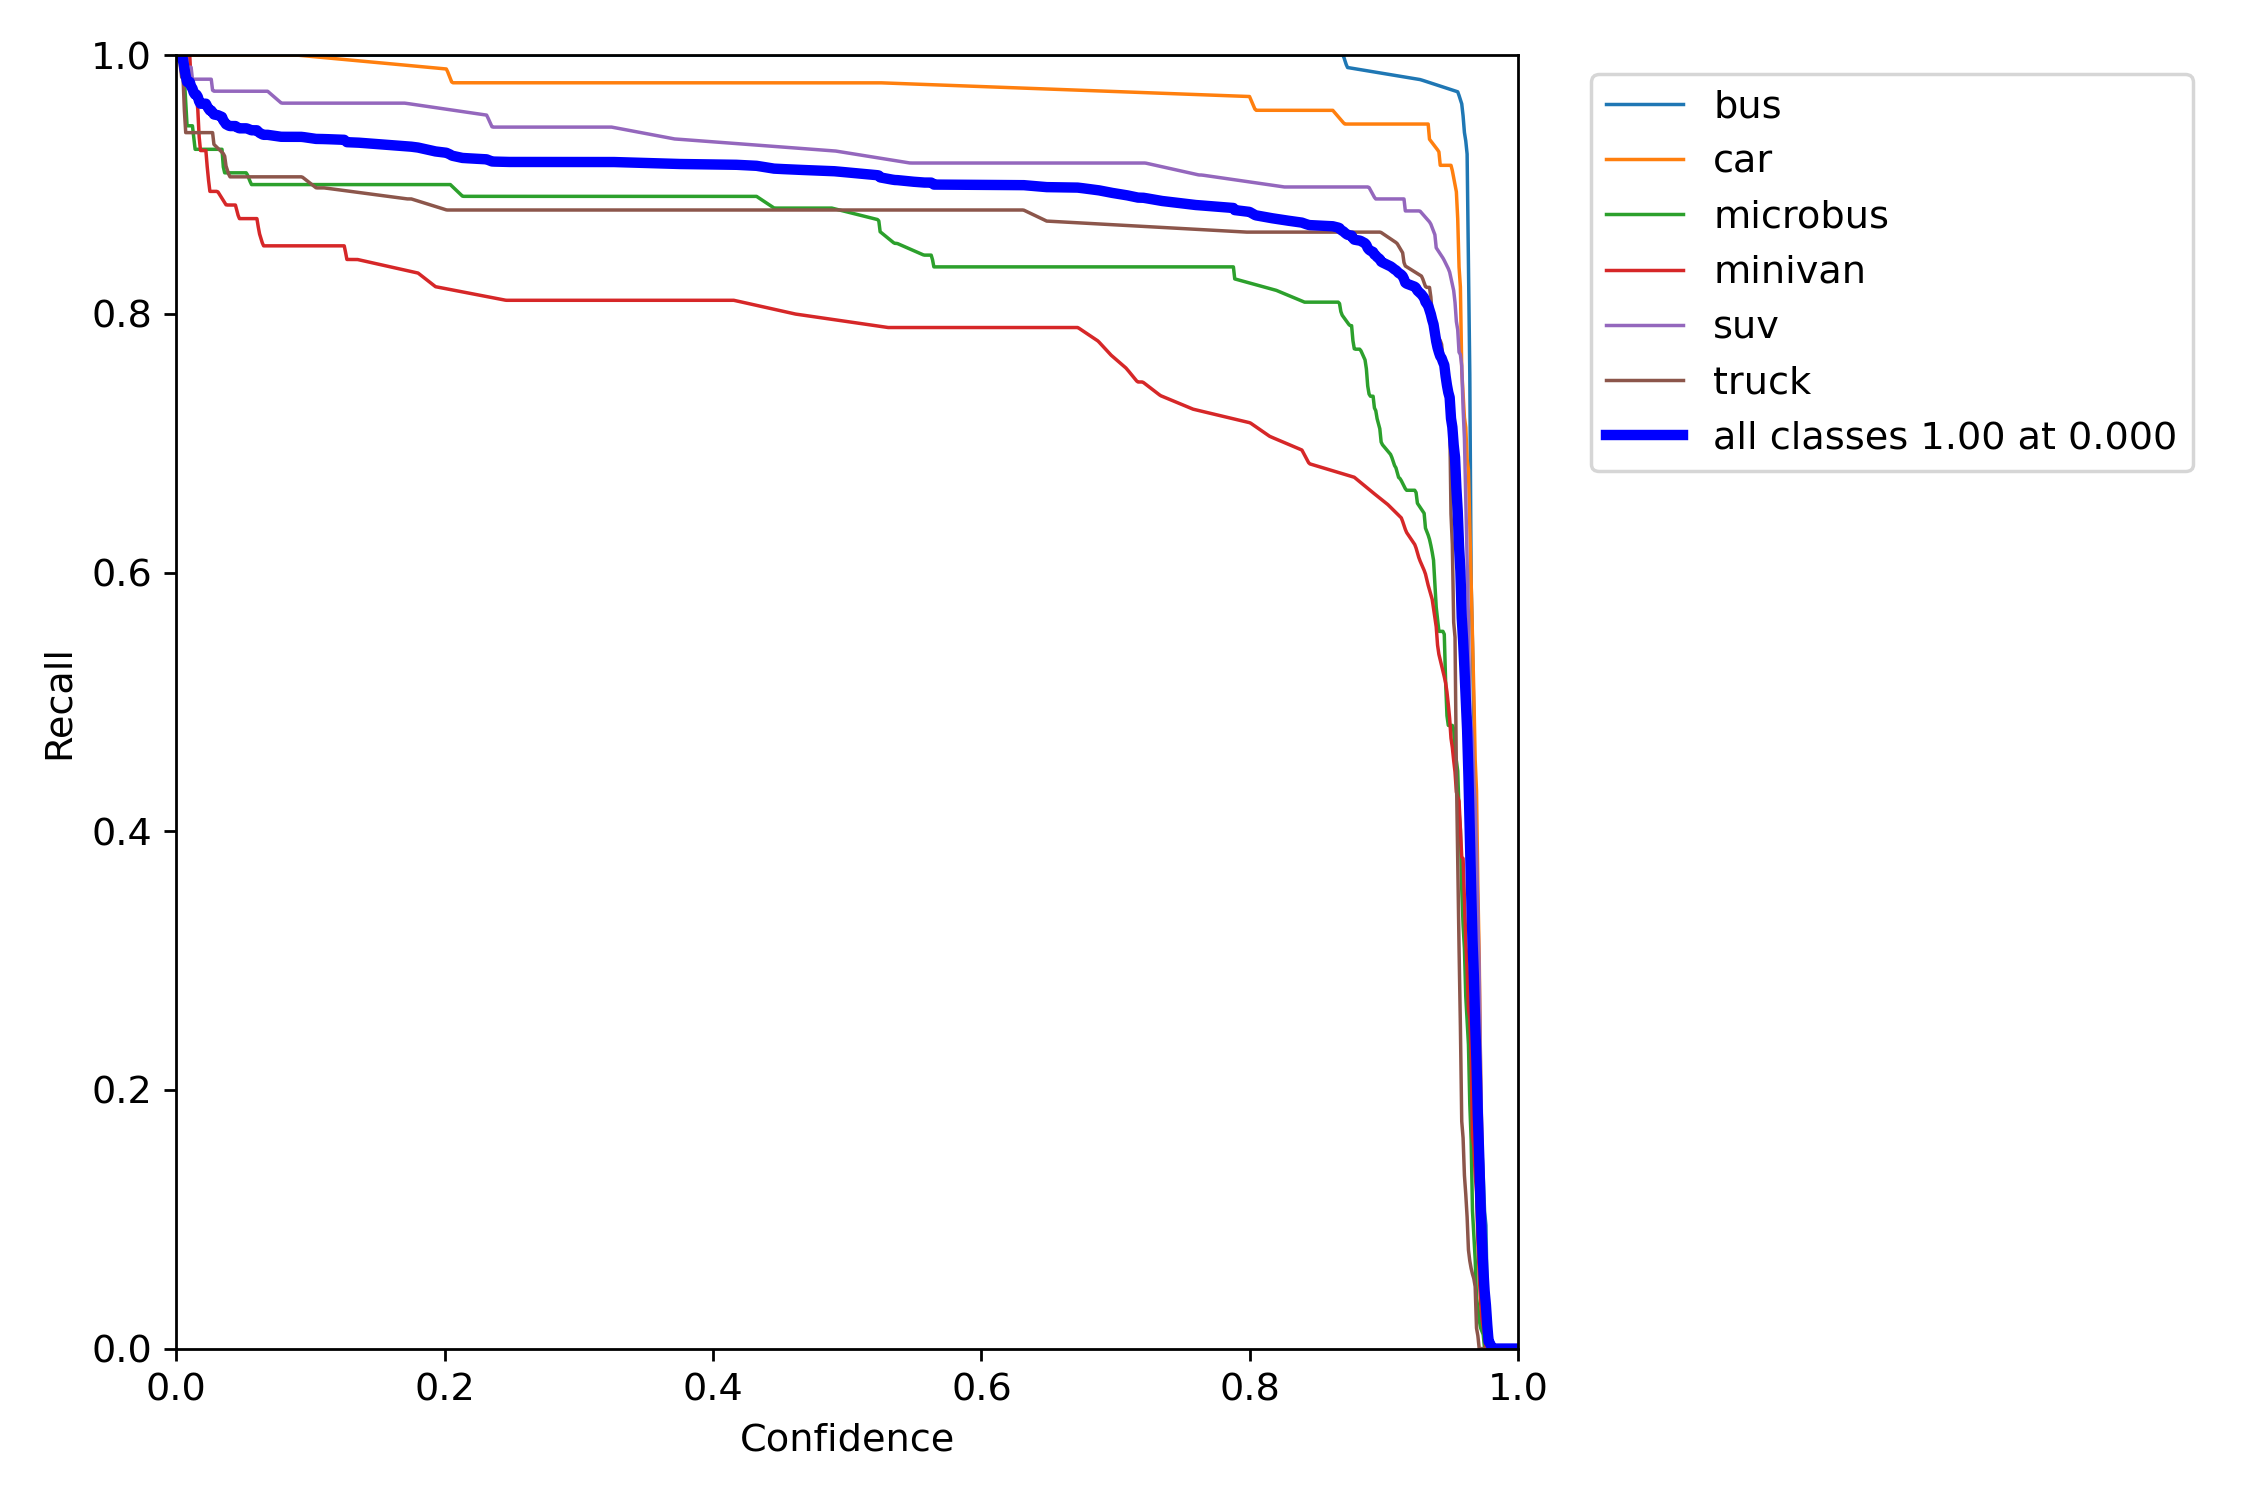
R是召回率的曲线
result.png表示训练过程中的损失和精度的变化趋势

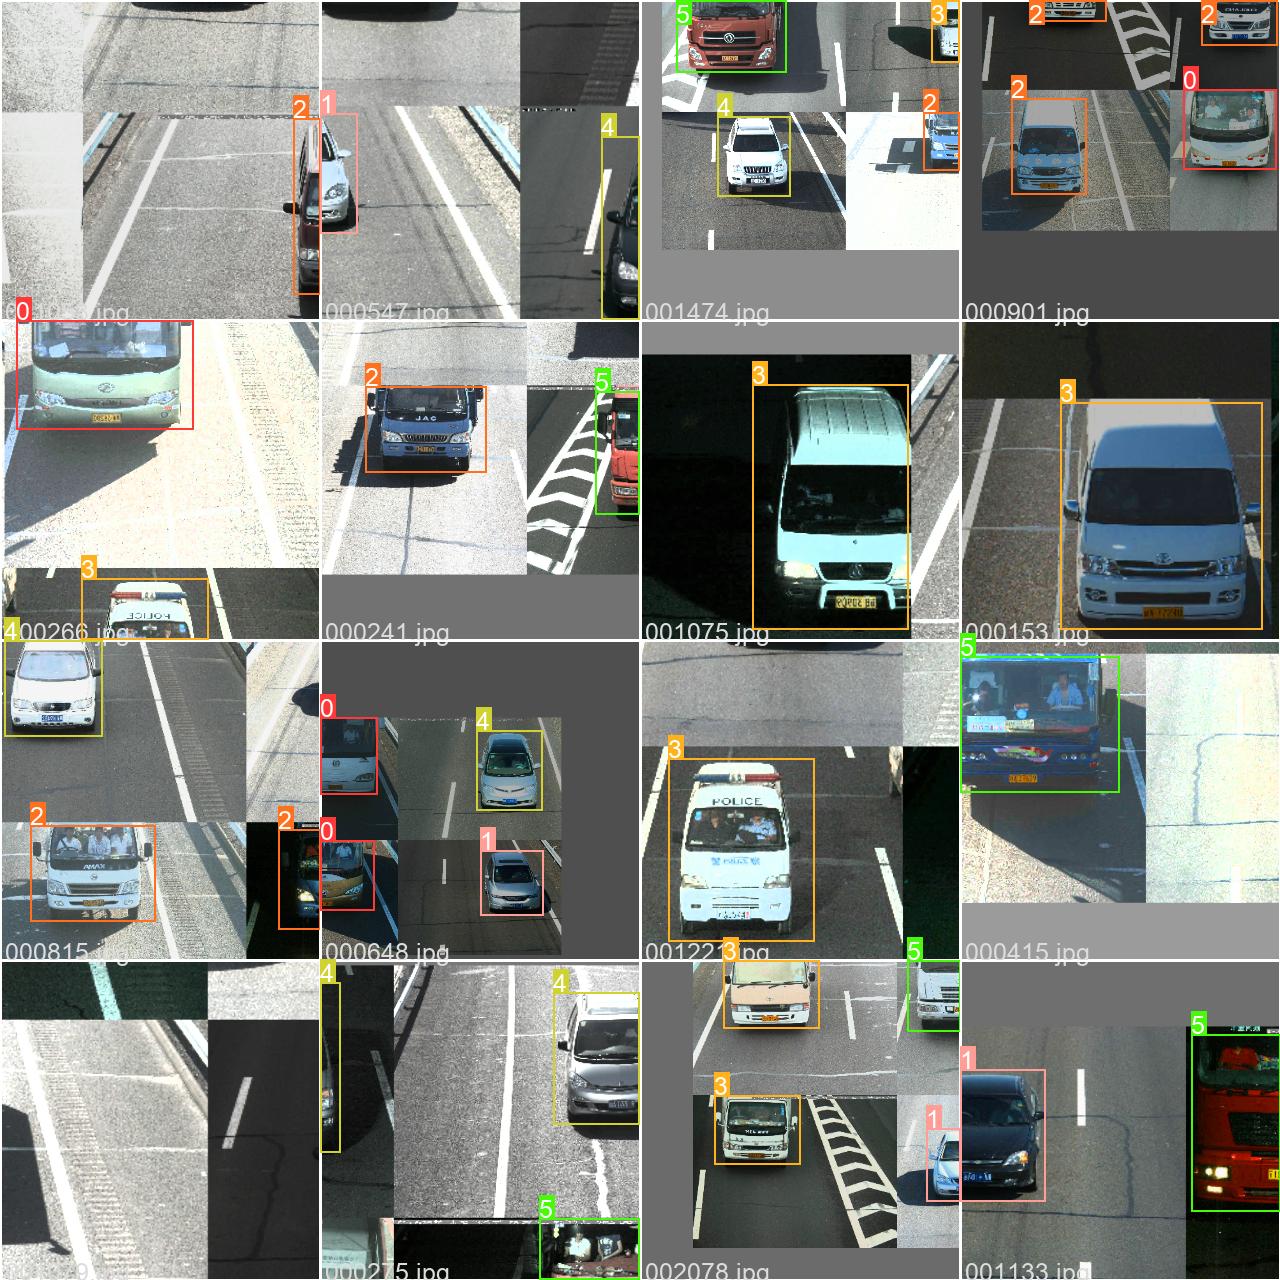
train表示实际的标签是怎么样的
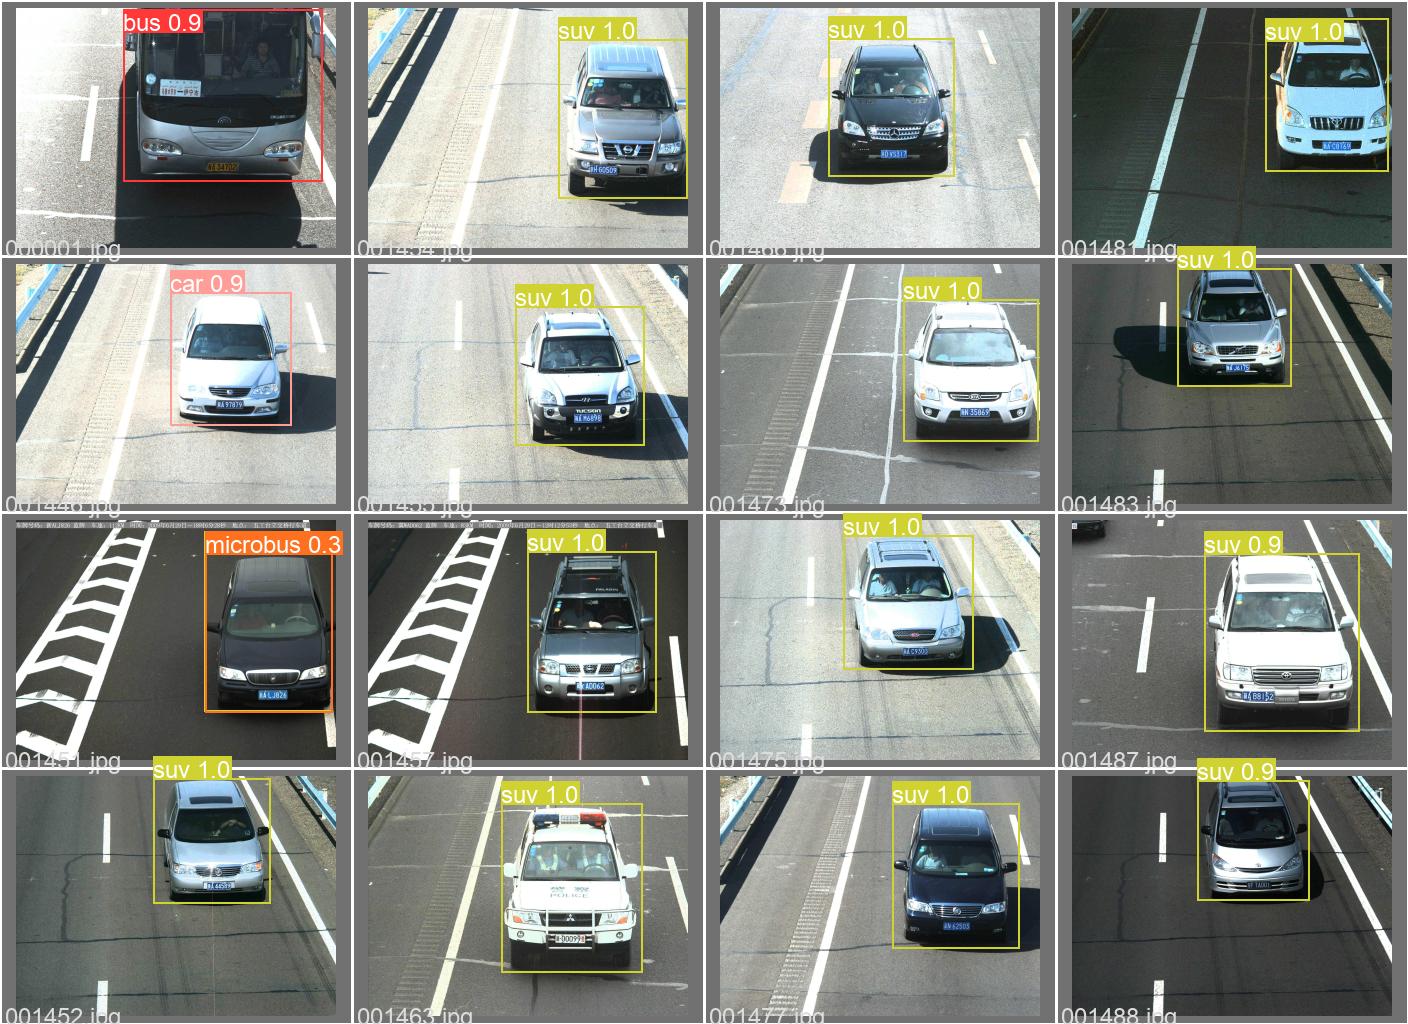
val表示模型预测出来的效果大概是怎么样的
hyp.yaml表示超参数的
lr0: 0.01
lrf: 0.1
momentum: 0.937
weight_decay: 0.0005
warmup_epochs: 3.0
warmup_momentum: 0.8
warmup_bias_lr: 0.1
box: 0.05
cls: 0.5
cls_pw: 1.0
obj: 1.0
obj_pw: 1.0
iou_t: 0.2
anchor_t: 4.0
fl_gamma: 0.0
hsv_h: 0.015
hsv_s: 0.7
hsv_v: 0.4
degrees: 0.0
translate: 0.1
scale: 0.5
shear: 0.0
perspective: 0.0
flipud: 0.0
fliplr: 0.5
mosaic: 1.0
mixup: 0.0
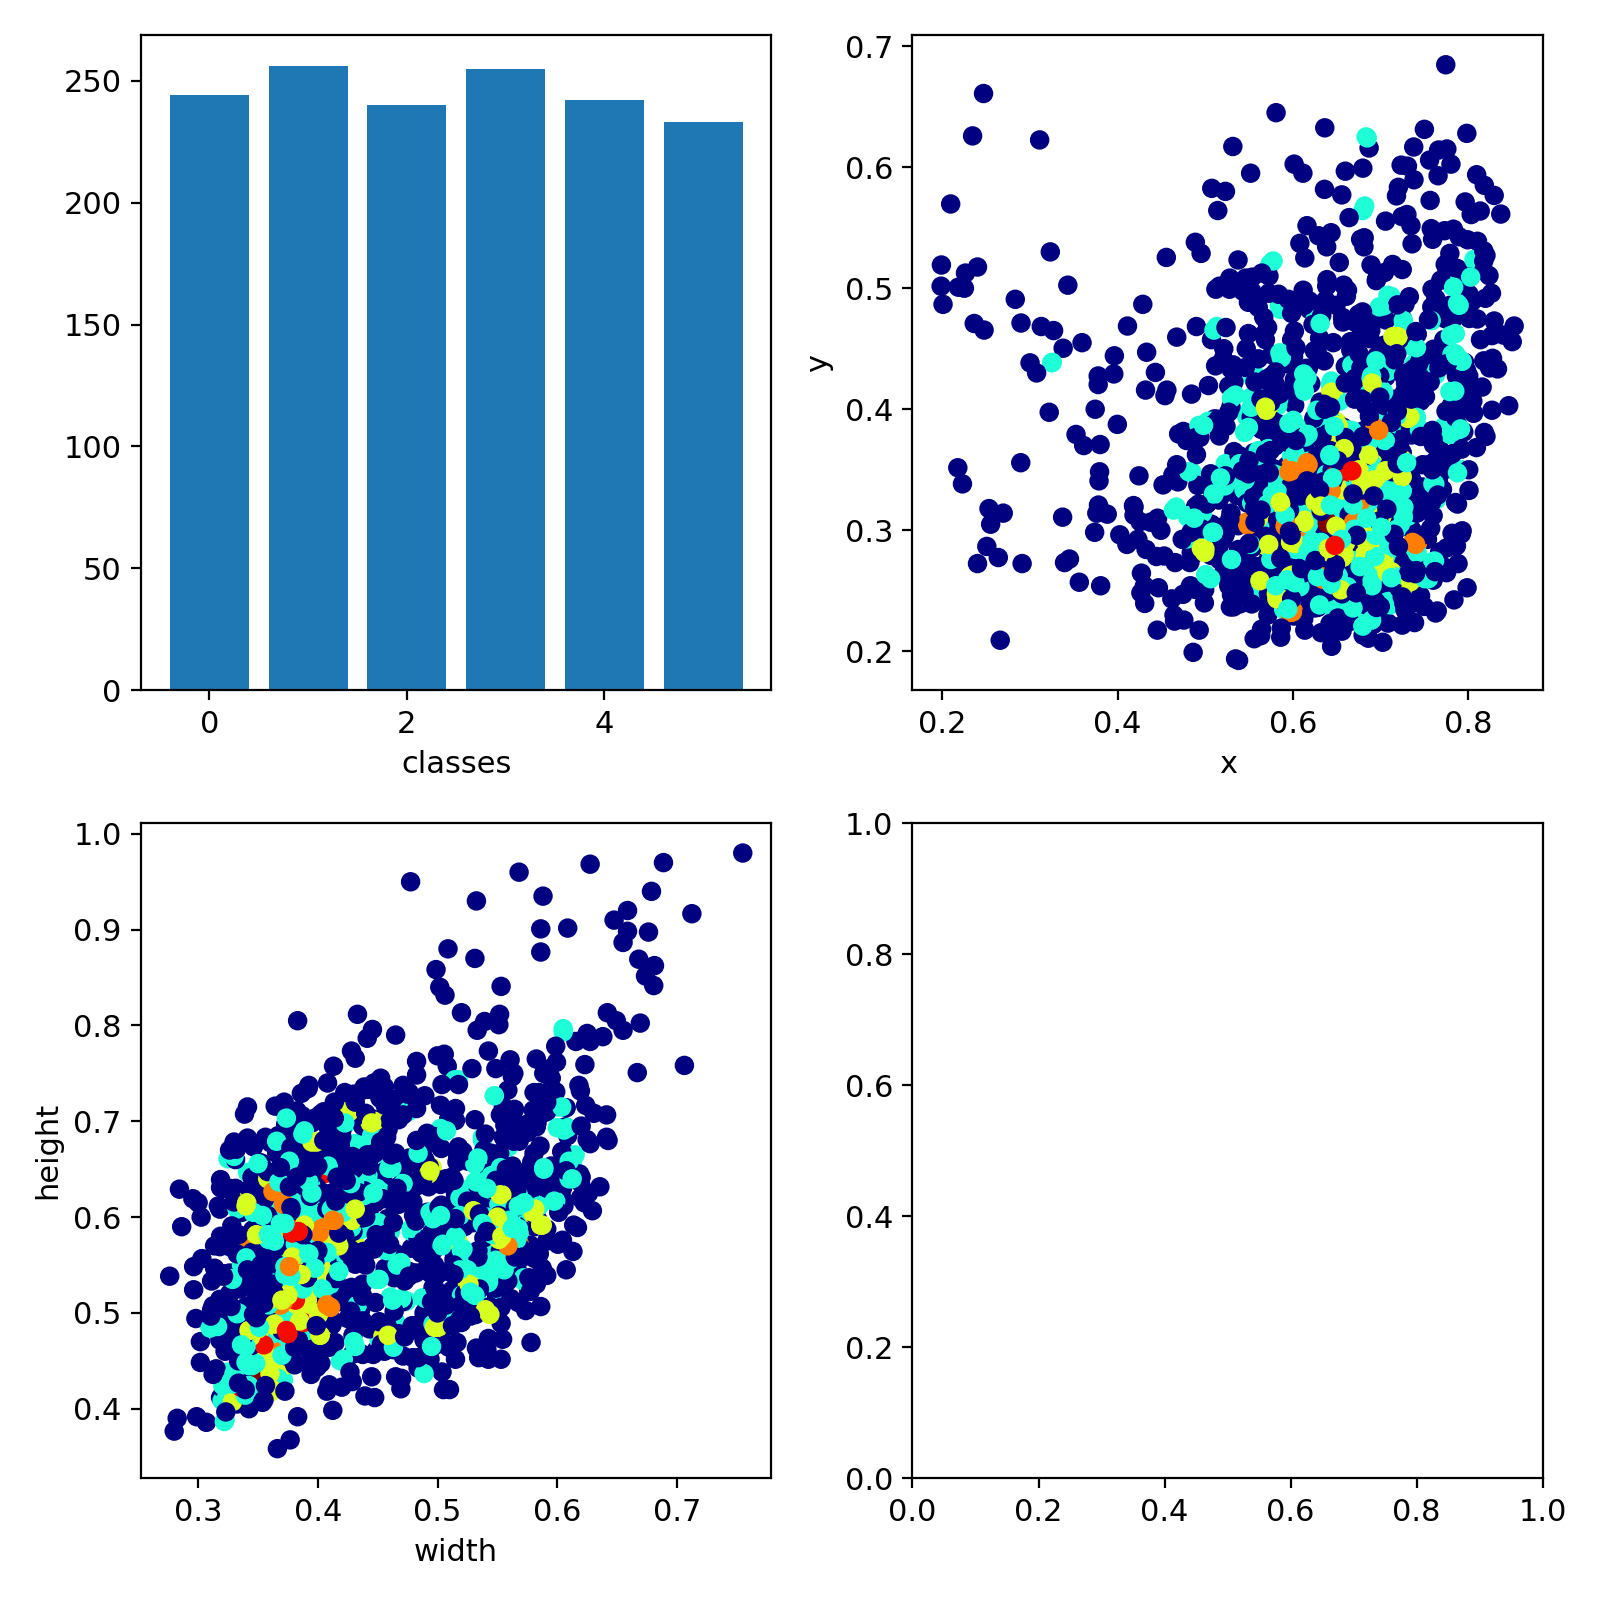
copy_paste: 0.0labs是表明在这个数据集中每类数据集的数量
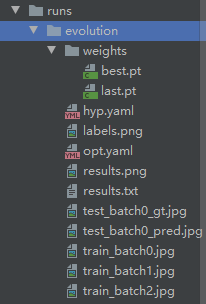
best.pt是表现最好的模型
last.pt是最后一次训练的模型
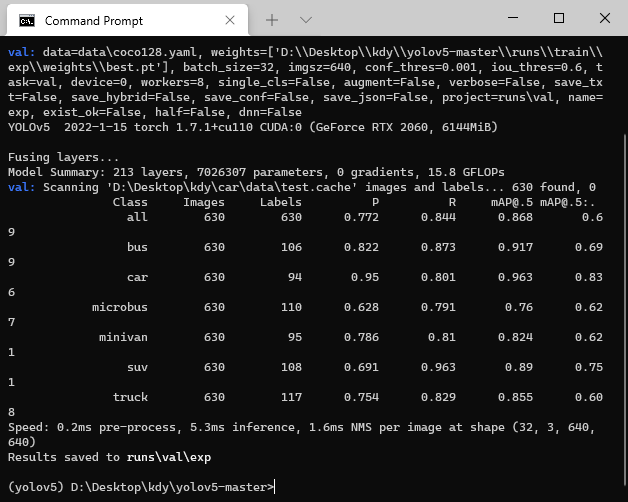
val.py文件用来单独对于权重文件做验证,使用方法和detect.py类似